Lifecycle management console - BI 4 Tool
Lifecycle management console in Business Objects 4.0 takes the place of Import Wizard tool in B.O. XI, so it's function is to transport new developing from developing B.O. enviroment to production enviroment.
Let see GUI components in the lifecycle management console tool.


2. In the "Promotion Jobs" home page, click Import LCMBIAR.4. In the Password field,Enter the password of the LCMBIAR file

See LCM & BO Dashboards:
LCM & BO Dashboards
For more detailed information:
Lcm managing infoobject versions
Read also:
Migrating universes to SAP Business Objects 4.0
How to import or export with lifecycle from cmd line
Let see GUI components in the lifecycle management console tool.
The lifecycle management console tool home page is divided into the following panels:
• lifecycle management console workspace toolbar
• Workspace panel
• Tree panel
• Administrator and Details panel
• Shopping Cart and Job Viewer page
Promoting Overrides

Promoting Overrides Through BIAR Files

Using Lifecycle management console
Promotion Job
When you log into the lifecycle management console application, by default, you are taken to the
"Promotion Jobs" page. The "Promotion Jobs" home page screen includes various tabs that you can
use to perform the following tasks:
• Select New Job to select job-related processes. You can also right-click the home page screen and
select the job-related processes from the list.
• Select Import > Import LCMBIAR file to import a BIAR file directly from the file system, instead of
performing the entire procedure of creating a new job.
• Select Edit to edit the existing jobs.
• Select Promote to promote a job from the source system to the destination system, or export a job
to a BIAR file.
• Select Rollback to revert the promoted jobs from the destination system.
• Select History to view the previous promotion instances of the job.
• Select Properties to view the properties of the selected job instance, such as title, ID, file name,
and description.
The "Promotion Jobs" application area displays the jobs that exist in the system, along with the following
information for each job:
• Name: Displays the name of the job that was created.
• Status: Displays the status of the job, such as Created, Success, Partial Success, Running, or
Failure.
• Created: Displays the date and time when the job was created.
• Last Run: Displays the date and time when the job was last promoted.
• Source System: Displays the name of the system from which the job is promoted.
• Destination System: Displays the name of the system to which the job is promoted.
• Created by: Displays the name of the user who created the job.

You can create a new job by copying an existing job.

The "Manage Dependencies" window appears. This window displays the list of infoobjects and their
dependents, as shown in the following figure:
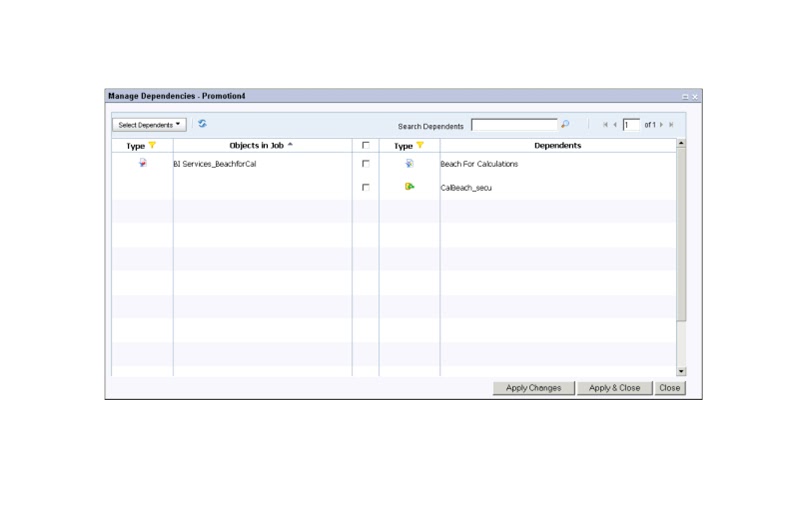
From the Select Dependents drop-down list, select any of the options available to add the dependents
to the job. The dependents are displayed on the right side. The dependents are not selected by
default; you must explicitly select the dependents you want to promote.
Exporting a Job to a BIAR File
This section describes how to export a job to a BIAR file.
To export a job to a BIAR file, complete the following steps:
1. Log into the lifecycle management console tool, and create a new job.
For more information on creating a new job, see Creating a New Job
2. From the Destination drop-down list, select Output to LCMBIAR file option and click Create.
3. Click Add Objects to add infoobjects to the job.
You can use the Manage Dependencies option to manage the dependencies of the selected job.
4. Click Promote.
The "Promote" window appears.
5. Modify these options per your requirements, and click Export.
The BIAR file is created. You can save a BIAR file to a File System or an FTP location.
6. From the Destination drop-down list, select Output to LCMBIAR file, and click LCMBIAR File
Destination.
The LCMBiar File Destination pane appears.
7. Perform one of the following steps:
• Select File System.
• Select FTP, enter appropriate details in the host, port, username, password, directory, and
filename fields.
8. To encrypt the LCMBIAR file using password, click Password Encryption checkbox.
9. Enter a password in the Password field.
10. Re-enter the password in the Verify Password field.
11. Click Export.
The BIAR file is exported to the file system or an FTP location, depending on the option you select in step 7.
Importing a Job from a BIAR File
Copy the BIAR file from the storage device to the destination system.
To import a BIAR file, complete the following steps:
1. Log into the lifecycle management console tool.
The "Import LCMBIAR file" window appears.
3. Click Browse and select a BIAR file from the file system.
Note:
The Password field appears only if the LCMBIAR file is encrypted with a password.
5. Click Create.
The job is created.
6. Click Browse to select a folder to save the job, and click Create.
You can also manage the dependencies of the job in the "Managing Dependencies" window.
7. Click Promote.
The "Promote - Job Name" window appears.
8. From the Destination drop-down list, select the destination system. If you select Login to a New
CMS, you will be prompted for credentials. Confirm the login credentials of the destination system.
9. Click Promote to promote the contents to the destination system.
You can also click the Test Promote option to view the objects to be promoted and the promotion
status.
Scheduling a Job in Lifecycle management console
The lifecycle management console tool enables you to specify when a job must be promoted, rather
than promote it as soon as it is created. It also enables you to schedule job promotion at fixed intervals.
This feature is useful for promoting large jobs when the load on the server is at its minimum.
To schedule a job promotion, you must specify a time in future or select a recurrence pattern, and
specify additional parameters.
The following table discusses the recurrence patterns that the lifecycle management console tool
supports for scheduling a job promotion.
Scheduling a Job Promotion
This section describes how to schedule a job promotion. It also describes how to specify recurrence
options and parameters.
To schedule a job promotion, complete the following steps:
In the "Promote - Job Name" window, click the Schedule Job option.
Updating the Recurring and Pending Job Promotion Instances
The lifecycle management console tool enables you to track and update the status of a scheduled job
promotion instance by using the Recurring and Pending Instances option.
To track and update the scheduled job promotion instances, complete the following steps:
1. Log into the lifecycle management console tool.
2. In the "Promotion Job" home page, select a job.
3. Click History.
The "Job History" window appears.
Click Recurring & Pending Instances.
The "Job History" window appears, as shown in the following figure:

See LCM & BO Dashboards:
LCM & BO Dashboards
For more detailed information:
Lcm managing infoobject versions
Read also:
Migrating universes to SAP Business Objects 4.0
How to import or export with lifecycle from cmd line

Comments
Post a Comment